Monday, September 20, 2010

HOW TO PLANT ROSES

The scoop on planting roses

Where to plant your rose?

First let's look at that sunny (more than 4 hours direct sun; no skimping) spot in the yard. How's the water situation? Roses like plenty of moisture, but hate boggy situations and will express their distaste by simply dying! If the area is really wet I'd recommend that you plant roses in a raised bed, building a containment of rock, block or railroad ties that give another two feet or so of planting depth above the existing soil profile.


Just a little damp? Adding sand can help slightly moist soil if it's just a little damp, but unless more than 30% of the total soil volume is sand it will actually hold MORE water. And sand decreases fertility so I feel raising the bed is really the best way to go (unless you like the idea of native roses like R. nitida or R. palustris, both wild swamp specialists from the eastern half of the States and hard to find in the trade).

What if the soil isn't wet but really dry? We can amend the soil with peat, manure humus and compost (preferably all of the above) and till it in to a good 12"depth OR we can build the raised bed again and have total control of what our soil is like! If it sounds like I like raised beds for roses there is a good reason. One, I do and secondly (and more importantly), roses are about as fussy as any plant out there about soil conditions. If we start by tilling, sure we have given them the fluffy, light soil they like but we've also tilled up dormant weed seed (Crabgrass, for instance, can lay dormant for 100 years!) and the last thing a rose wants is root competition from a hungry feeder like grass. Give raised beds a look.

Landscape roses

Groundcover roses like Flower Carpets or the Pavement series offer beautiful solutions for that tough hillside or narrow strip along the parking area that were the traditional haunts of Blue Rug Juniper. These and other landscape roses are just that; roses to be used in the landscape, not bedded down delicately like some of their sissy cousins. Certainly it improves the plant to get some soil amendment but nothing more than you would do for an azalea or spirea. These tough guys don't ask for any special treatment and they are ready to take on hard areas in your landscape so don't overlook these roses, especially if you might miss a week or three of gardening on occasion…

How do I plant my rose?

This is a fairly simple process but we first need to know what we're planting. Roses are sold a few different ways. Bare-root roses (often called box roses) are found in many garden centers and this is the usual way to get them if you have them shipped in the mail. I maintain you must plant bare-root in the spring and give them a season to find their feet (Some feel you can plant them in fall if the early winter is mild; why risk it?)
Container, or potted roses have better shelf life, better root development and I might plant a container rose in fall (especially if it was a landscape rose). These are more expensive than bare-root, and the dramatic debate rages on over the pro's and con's of each (it's usually me and the guy on the corner with fifty roses).

Container roses are easier to plant; you just plant at the soil level of the pot the same as any other flower or shrub. Bare-root must be positioned carefully depending on your climate. Warm winter areas should plant with the bud union (the swollen joint between the root stock and the scion or grafted cane) 1" above soil level, moderate winter areas (Zone 7&8) at soil level and hard areas should bury the bud union 2" below the soil to ensure the survival of the scion. Some roses today are being sold on their own root stock (species usually are) so don't panic if you can't detect a bud union; there may not be one. And remember, bare-root MUST be planted while still dormant so watch your rose and the thermometer closely.

Ideal Rose planting time

Planting times vary all over the country but here's a quick list.
  • Northeast, and Eastern coast
    March until June, October and November
  • North Central
    April to June, October and November
  • South Central
    December to February
  • Southwest, and Pacific Coast
    December and January
  • Pacific Northwest
    January to April
Read your rose tag to find out about eventual height and width (if you haven't already) and space plants accordingly. Remember to dig those holes twice as wide and half again as deep as the plant you are planting and to water heavily after planting to eliminate air pockets left from planting…

The Bonica rose was voted the World's Favorite Rose in 1997 by the World Federation of Rose Societies, and an All America Winner in 1987.The Bonica deserves the acclaim.
Bonica roses are easy to grow , and are very colorful and disease resistant. This landscape rose can be planted as a hedge, specimen, or focal point.


The Knock Out, Rosa 'Radrazz' (PP11836) rose is a glowing example of disease resistance at its best. The cycle of bloom and growth provides a continuous show of color from spring until late fall. This maintenance free, flowering shrub thrives in all climates with a petal count of 5 to 7.
The deep, almost fluorescent cherry red blooms give off a light tea rose fragrance. Clusters of 3 to 15 flowers bloom alongside glossy foliage tinged in eggplant purple with a swirl of burgundy. It is an AARS winner.

Friday, September 17, 2010

Bird Bath Attractions

Bath Attractions


Baby RobinSometimes fresh, clean water is hard for a bird to find. You can make a bird's day simply by offering a drink and a bath.

Parent birds will often bring their babies to the bath after they fledge and show them where it is. Like the baby robin getting its first bath.

Water will actually attract more species of birds than feeders will. Birds such as wrens, catbirds, and waxwings, who eat insects or fruit, don't visit most feeders.

But a birdbath attracts all kinds of birds. Bluebirds, robins, catbirds, warblers and thrushes. We've even watched screech owls drinking from a birdbath right in town at dawn.

Bluebirds and Waxwings
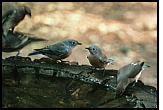
Put your birdbath in your garden, and the birds will find it quickly. We took the photo at left, of bluebirds and cedar waxwings, 15 minutes after we first filled our homemade birdbath. We hollowed out a shallow basin in a section of a pine log. It was so heavy that we had to roll it into place. And it was rough, but it was a major hit with the birds.

It was a hit with us, too. Watching birds at the birdbath brings great happiness to a home. It's one of the easiest ways to bring birds up close, where the whole family can get a really good look and enjoy their beauty.

What kind of birdbath is best?

Shallow
No deeper than three inches at the center. It should be even shallower at the edge, so that a bird can ease its way in. Many birdbaths are way too deep. If you have one that's too deep, you can put rocks in it to raise the bottom. However, it will require you to work a little harder to keep the water clean.

Rough bottomed
Birds don't want to lose their footing. They don't like a glazed, slippery bottom. Cement is good, but it's heavy and hard to handle. Some of the new fiber-and-resin baths are amazingly lightweight, and they have a rougher texture, that makes birds feel secure.

Drippy or sprinkly
The plink or splash of moving water is pure invitation to birds. It dramatically increases the number of species that visit a birdbath. For example, hummingbirds would never wade into the bath the way a robin does, because hummingbirds bathe only in flight. But I have watched hummers zipping back and forth through the drips, timing their flights so that they catch a water drop on their backs on each pass.

Sun power

Solar SpaThere are also baths available now with solar-powered spray features, such as the Solar Spa bath shown at right.


We have one of these at the Birdwatching Dot Com garden, and we love to watch the birds come visit it.

To upgrade a regular birdbath to a moving-water feature, arrange a garden hose so that its water trickles or drips into the bath.

Water Wiggler
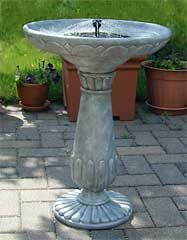
You can turn a still-water birdbath into a live-water bath by putting an inexpensive Water Wiggler in it. This is the same unit that makes the Water Rippling Birdbath work, but it's just the wiggler part. You put it in your own birdbath.

Some people make a 1/2-inch hole in the bottom of a bucket and plug it with a bit of cloth, and suspend the bucket over the birdbath. The dripping water makes plinking sounds that birds can't resist. You can also install a small spray fountain designed for birdbaths. And we've seen a solar spray pump kit that you can add to an existing bath.

Where should a birdbath be located?

Cat watching birdbathNot where cats can hide.
Cats like to lie in wait beneath shrubbery or behind a concealing object and then pounce on the birds when they're wet and can't fly well. So put your birdbath at least five to ten feet from such hiding places. Give the birds a chance to see the cat coming.

With an escape route.
The ideal location is under some branches that hang down within two or three feet of the bath. A wet bird can flutter a few feet up to the safety of the leaves.

Pedestal BathOn a pedestal.
It's easy to see from the house, easy to clean, and somewhat safer from predators. If you locate your bath on the ground, it's important for the birds to have overhanging branches.

Within reach of a hose.

Make your birdbath easy to clean and refill. But locate your birdbath away from your feeding station, because seeds and droppings would soil the water quickly. Change the water every few days, or even every day in hot weather. Dump it out or squirt it out with the hose. I keep a scrub brush outside with my gardening tools, so that I can brush out any algae that begins to form.

In view from a window.
Bluebirds bathing
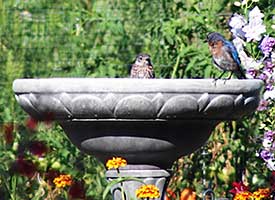
Don't forget to put yourself in the picture. Place the birdbath where you can see it from indoors, from your desk, dining room, or kitchen sink.

Or locate it in your garden. Nothing is more decorative in a garden than a father bluebird bringing his newly-fledged young and introducing them to the birdath.

A bird in the bath is the soul of enjoyment. The sight of it, even a chance glimpse through the window, will provide you too with a splash of happiness.

www.birdwatching.com

Wednesday, September 15, 2010

Airy Art

A bit of old wood and glass can be transformed into light-catching garden art.
etched watering can on window hanging
 
 
Quickly decorate your favorite
garden space.
 
What You Need:
  • Old window frame
  • Tracing paper
  • Clear contact paper
  • Craft knife
  • Glass etching cream
  • Latex gloves

tape watering can stencil to back side of glass
 
 
Step 1.
 
Instructions:
 
1. Find an old window frame at a junk shop or flea market or construct your own with salvaged wood and glass. Then draw our watering can motif or a garden image of your choice on a piece of paper. Tape the paper to the back of the glass with the image showing through.

apply clear contact paper to front of glass
 
 
Step 2.
 
2. Apply clear contact paper to the front of the glass. Use a craft knife to cut the image from contact paper. Remove paper from the back of the glass. Peel off sections of contact paper so the design shows through.

paint glass with etching cream
 
 
Step 3.
 
3. Follow the directions on glass etching cream, available wherever craft supplies are sold. Wear latex gloves. Apply the cream to warm room temperature glass with an artist's brush. Allow to etch according to directions. Rinse with warm soapy water. Remove contact paper.

Tuesday, September 14, 2010

Spirit Jugs


Stationed on a walkway or porch, these homemade lanterns will extend a ghostly greeting and good-bye to all your holiday visitors.

Materials :

  • Clean plastic gallon milk jugs
  • Black permanent marker
  • Craft knife
  • String of 50 clear low watt holiday lights

Directions


  1. Draw ghost eyes and mouths on the jugs. Tip: Leave the caps on while you do this, so the jugs don't dent.

  2. Use the craft knife to cut a half-dollar-size hole in the back of each jug (a parent's job).

  3. Arrange the ghosts near each other and string the lights between them, stuffing several bulbs into each of the jugs.


The 15 Most Beautiful Flowers In The World

  • Canna

    Cannas not only feature pretty blossoms, but also beautiful leaves (often likened to that of the banana plant) that come in a variety of stunning colors. Popularized in Victorian times, Cannas are popular garden plants.
  •  Cherry Blossom

    The unofficial flower of Japan, the spectacular display of blossoms that arrive in the spring are celebrated by festivals both in Japan and the U.S. The most popular colors are white and pink. They are beautiful while on the trees and remain a stunning sight even after carpeting the ground.
  • Colorado Columbine

    Growing high in the Rocky Mountains, the Colorado Columbine is a welcome reward for the enterprising climbers of Colorado's 14,000-foot high mountains. Picking one in the wild carries a fine ($5-$50 depending on the Ranger who catches you)!
  • Hydrangea

    Magical snowball puffs in fall: gorgeous. The clusters of star-shaped blossoms, often found in delicate pastel hues, embody innocence. They are popular in wedding bouquets and as garden flowers.
  • Lily of the Valley

    A delicate and fragrant sign of spring, the Lily of the Valley has inspired a number of legends. One such Christian legend explains that the tears that Mary shed at the cross turned to Lilies of the Valley, prompting the flower to sometimes be referred to as "Our Lady's Tears." Another legend tells of Lilies of the Valley springing from the blood of St. George during his battle with the dragon.
  • Calla Lily

    While visually stunning and elegant, this beautiful flower is actually a member the poisonous species, Zantedeschia. All parts of the plant are highly toxic, with the capability to kill livestock and children if ingested.
  • Black Eyed Susan

    The black eyed susan, a cheerful wildflower, is a perennial that serves as a beautiful back drop in any garden. The contrast of the bright gold yellow petals and dark middle makes it any easy one to spot and recognize. This official drink of the Preakness stakes horse race is named after this flower, consisting of 2 parts Bourbon whiskey, 1 part citrus vodka, 3 parts sweet & sour mix, one part orange juice and garnished with orange and a cocktail cherry.
  • Bleeding Heart

    These whimsical, almost fairy-like blossoms are a traditional favorite in shady gardens. The flowers are either red, pink or white and appear in April-June.
  • Blue Bells

    In spring, many European woods are covered by dense carpets of this flower; these are commonly referred to as "bluebell woods". It is thought that they were named by the romantic poets of the 19th century, who felt they symbolized solitude and regret.
  • Lantana

    These delicate flowers, with their pink and yellow petals, are butterfly magnets. The bush can grow to be quite large and the color of the petals change as the plant ages. Beware - Lantana is considered a weed by many that is quite difficult to get rid of.
  • Rose

    Roses are one of the most romantic and wonderfully scented of flowers. The giving of roses is steeped in tradition and cultural meaning, from the yellow rose of friendship to the deep red rose of true love.
  • Oriental Poppy

    This perennial poppy has a delicate and striking color. After flowering in the spring, their foliage dies back entirely, only to grow new leaves once again with the autumn rains. The Oriental Poppy is the flower of The Wizard of Oz.
  • Mussaenda erythrophylla (Ashanti Blood, Red Flag Bush, Tropical Dogwood)

    These plants are native to the Old World tropics, from West Africa through the Indian sub-continent, Southeast Asia and into southern China. The beautiful red and yellow petals are a real showstopper. A favorite of not only of gardeners, but also butterflies, bees and hummingbirds.
  • Begonia

    The first Begonia was introduced into England in 1777. Now one of the most popular flowers grown in the United States, Begonias are prized for their flowers as well as their leaves. This versatile plant can be grown either inside or out.
  • Ixora

    Ixora flowers, also commonly called West Indian Jasmine, are often used in Hindu worship, as well as in Indian folk medicine. This plant has traditionally been associated with enhanced sexuality and the re-kindling of passion. Who wouldn't want that as a gift!
  • Dendrobium

    Dendrobium is a large genus of tropical orchids that include over a thousand species. The sprays of flowers are so delicate and yet so perfectly formed, they appear magical.

Monday, September 13, 2010

Container Water Gardening

A mini-aquatic garden in a tub or other container located close to the house on a deck or patio, can provide you with a unique gardening experience. Containers are a great way to try out the idea of water gardening without committing to a larger, more permanent pond. A container aquatic garden is a small commitment in terms of finances and labor. It doesn't require special aerators or filtration if set up and properly managed.

The Container
A container with a capacity of 15-25 gallons is practical. Many commercial containers are available or you might consider things like small kiddie pools, horse watering troughs, lined whiskey barrels or even old bathtubs. Remember that water weighs about 8 pounds per gallon, so be sure the location of your container will be able to hold the weight. Locate the garden so it receives a minimum of six hours of sun a day. Most aquatic plants need full sun. Some of the bog plants can survive in less. Less than six hours will decrease the blooming potential of aquatic plants. Choose containers with interiors that are dark in color. Dark green, charcoal or black colors are suggested because they give the container an impression of greater depth, discourage algae growth, and make algae less obvious when it is present. Stones and slate can be added for interest, but keep in mind that choosing dark colored rock will help discourage algae.


Planting the Garden
Plants used in small aquatic gardens are grown in separate pots and then these pots are placed into the water-filled container. Heavy, clay garden soil is used as a potting media. After the plant is potted, top the soil with a 1/2 to 3/4 inch layer of pea gravel to help keep the soil in place. Don't use a commercial potting soil mix or any type of soil mix containing fertilizer. Fill the tub with water and set your plants in place. Some aquatics prefer to be placed at certain depths in the water.

Adjust the depth of your plants by placing bricks under the pot so the crown of the plant is at the preferred depth. About 50 - 60% of the water surface should be covered with plant material. Take note of the type of water used to fill your container. City water supplies are commonly treated with chlorine. It is a good idea to let the tub sit for 24-48 hours before adding plants to allow the chlorine to evaporate. Many city water supplies are now using chloramine, a more stable form of chlorine. If this is the case, you might want to purchase a product to remove the chlorine. These are available from garden centers and pond supply dealers. Don't use water from a water softener and don't add chemicals to the water.
A tub garden is a miniature ecosystem of plants, water and fish. This system must come into balance which means that the plant and animal life are able to hold the algae growth in check. It will take approximately 3-4 weeks for this to occur. Two weeks after you set up the garden, the water will turn cloudy with algae. In another week or so, the water will clear and remain that way. The aquatic plants and animals keep the algae under control by reducing the sunlight entering the water and competing with the algae for nutrients in the water. 

Plants for the Aquatic Garden
Aquatic gardens need a mix of plants to attain a balanced system. These plants can be a combination of emergent, submerged and floaters.


Submerged Plants
These are also called oxygenators and help clean the water and supply oxygen. Some to consider include:

Wild Celery (Vallisneria sp.) Ribbon-like, translucent, pale-green leaves. Will grow in shade, part-shade and sun in water that is 6– 24 inchesdeep.

Fanwort (Cabomba canadensis) Bright green fan like foliage. Fish tend to use them to spawn and fry will find shelter in the leaves. Will grow in sun to shade in water that is 6– 12 inches deep.

Anacharis (Egeria densa) Whorls of deep green leaves with occasional white flowers on the surface. Most common oxygenator. Grows in water 12 inches – 10 feet deep.

Emergent Plants
These plans are potted and placed from 3 – 6 inches below the surface of the water. Some to consider are:

Arrowheads (Sagittaria sp.) Attractive, green arrowhead shaped leaves. White blooms in the summer. Grows from 12 – 48 inchestall. Tolerates sun to part shade.

Blue Flag Iris (Iris versicolor) Mixed blue flowers in June with grass like foliage. Grows from 24 –30 inches tall and will tolerate full sun to part shade.

Dwarf Papyrus (Cyperus isocladus) Green grass like foliage with "starburst like" flowerheads that turn brown in the fall. Grows 12 – 18 inchestall and tolerates sun to part shade.

Water Blue Bells (Ruellia brittoniana) Green grass like foliage growing to 24" –48" tall. Blue flowers in summer resembling petunias. Tolerates sun to part shade
.
Cork Screw Rush (Juncus effusus) Interesting twisted and curled stems. Grows to 24" tall and tolerates full sun to part shade.

Lotus and Water Lilies
Several of the smaller hardy and tropical water lilies do well in containers and can add both color and fragrance. Lotus are also a dramatic addition to water gardens. Both water lilies and lotus prefer full sun.

'Joanne Pring'- A hardy miniature pink water lily with green leaves and deep edge
'Tetragona'- A hardy miniature white water lily with freckled leaves
'Helvola'- A hardy miniature yellow water lily with freckled leaves
'Hilary'- A tropical day blooming pink water lily with green leaves
'Red Flare'- A tropical night blooming red water lily with maroon leaves
'Momo Botan' Lotus Grows to a height of 24" and offers rose blooms July – September
'Wan-er Hong' Lotus Grows to a height of 12" and offers white blooms June – September

Floaters
These plants add a finishing touch to the water surface. Some plants to consider are:

Giant Velvet Leaf (Salvinia longifolia) Unusual floating fern with pale green round hairy leaves.
Water Hyacinth (Eichhornia crassipes) Popular floater with long, trailing roots, balloon like petioles and spikes of pale lavender flowers.
Water Lettuce (Pistia stratiotes) Velvet, blue green leaves forming a rosette of foliage that looks like leaf lettuce.

Fish and Snails for Water Gardens
Pond creatures can be added to your water container for added interest and to help in maintaining the ecosystem balance. Several small snails are very helpful as they eat algae, fish waste, and decaying organic matter. Fish such as mollies, guppies, platys or gambezi are good choices. They do well in the variable water temperatures of a small patio pond plus they eat mosquitoes. Larger containers of 20 gallons or more can handle one to two goldfish. 


Overwintering the Garden
Plants in small water gardens will need to be brought in for the winter. Potted plants can be lifted out of the water and stored in water filled tubs in a cool, dark basement. They will go dormant and can be brought back to the garden in the spring after the weather warms. Floaters may be overwintered indoors in aquariums where there is high light. It may be best to handle these as annuals. Buying new plants each season. Any fish will have to be brought inside for the winter.

Sunday, September 12, 2010

No-Sew Roller Shade

 
Materials and Tools:
roller shade (Magic Fit - Amazon.com
2 yards of fabric (yellow background rich floral, item #3332 - Milling Around)
decorator trim (red, green, gold acorn fringe, item #2381 - Milling Around)
spray adhesive ( Hobby Lobby)
adhesive tape (Tesa clear double sided emblem adhesive tape - Caddo Paint)
shade hardware (Newell Wind - Lowe's)
painter’s mask 
scissors
Steps:
1. Go to a highly ventilated area for this first step. Lay your fabric out and spray with your adhesive. Spray about 6– 8 inches away. Be sure to use your painter's mask for this step.
2. Carefully lay your fabric on top of the roller. Crease any wrinkles out.
3. Back at your workspace, grab your scissors and cut the fabric along the edge of the shade.
4. Roll your shade back up.
5. Measure your trim along the bottom edge of the shade, leaving a little room on both sides.
6. Measure out the appropriate length for your double sided adhesive tape.
7. Press your tape into place and peel off the top layer.
8. Carefully press your trim onto the tape.
9. Tuck the trim on each side to hide the seam.

Saturday, September 11, 2010

Great plan for an inexpensive Greenhouse

How to build My 50 Dollar Greenhouse


http://doorgarden.com/10/50-dollar-hoop-house-green-house

Fall Mums

The Gardens last Hurrah... Fall Garden Mums
As our summer draws to a close and cooler temperatures begin to prevail, we know the growing season is nearing its end. But is it really the end... or time for a new beginning?
We've all heard the saying "Fall is for Planting


A very popular plant for late season color is Fall mums, sometimes Fall Mums called "Garden mums" or "Hardy mums". Fall mums were once known as Chrysanthemums but taxonomists have recently changed their botanical name to Dendranthema x grandiflora. Fall mums are available in a wide selection of colors, flower types... shapes and sizes. Fall mums are a low maintenance easy to grow plant that can be kept in containers or grown in beds. They are drought resistant and generally free of insect and disease pests.
 How to Grow and Care for Fall Garden Mums
Planting
Most Fall mums are purchased and planted from late August into September. Fall mums prefer to be planted in an area that receives full sun, but most cultivars can get by with a half day of direct sunshine. For ultimate growth, plant your new fall mums in fertile well drained soil. Poorly drained soil is the leading cause of winter mortality. Young plants... that is those in small containers should be planted 18" to 24" apart. Mature plants can be planted at any desired spacing providing they are planted no closer than just touching its neighbor. Fall mums in above ground containers need to be planted in a flower bed before the first hard frost!

 
Watering
Fall mums should never be allowed to wilt... especially newly transplanted plants. Check your fall mums every couple of days for watering until you become familiar with their needs, particularly during dry spells. Be sure to thoroughly water-in your new transplants.

 
Fertilizing
Newly planted fall mums will not require any fertilizer this season. During the next growing season begin feeding your fall mums as new growth emerges, with the plant food of your choice. Feed your plants monthly until August.

 
Over-wintering... getting them to come back again
Most fall mums are winter hardy in Colorado. One of the most important tips in over wintering fall mums is to keep the soil moist as winter approaches. If you're the tidy type... after several hard frosts have blackened the plants, cut them back to near soil level. If not, just leave the plants until the next growing season and cut them back then. 

Mulching your fall mums to a depth of 3" - 4" after the soil has frozen will help to ensure their return the following spring. The purpose of mulching your fall mums is to keep the soil frozen.
 
Re-growing... the following spring
Once your fall mums start re-growing... remove the old stems if you haven't done so previously. This is the time to start feeding your fall mums with your favorite plant food every month until August.

To encourage branching and compact bushy growth, its important to pinch your fall mums in early spring. Once your plants have reached 4" - 6" remove about 1" to 2" of new growth on every shoot. After the plants have grown 3" - 5" shoots from the first pinching... its time to pinch again. Stop pinching your plants around mid July. This may seem like a drastic measure... but come fall you'll be rewarded with compact bushy plants that are robust with flowers.
 
Propagating... giving new life to old plants
Your fall mums can be divided every two years in early spring. This helps maintain their vigor. To divide your plants simply take a sharp shovel and press it through the center of the plant and down into the soil. Dig out one of the halves and relocate it to a sunny area. Be sure to thoroughly water-in the new transplant. If you wish, the halves could be divided into quarters.

 
That's it. As you can see fall mums are very easy to grow. They'll provide you with constant color until the first hard freeze.

Friday, September 10, 2010

Fall Flowers - Top Fall Blooming Plants for the Perennial Garden

The trick to designing your garden with perennial flowers is making sure you have something wonderful in bloom all the time. Each season has its stars and fall flowering perennials have some of the best. Fall flowers have all season to grow, so many of them are tall and stately. Fall bloomers also tend to blossom in the jewel tones of the season, deep purples, rusts, scarlet and gold. For fall bloomers to be hardy in your garden, you need to plant and establish them earlier in the season. Here are some top picks for fall blooming perennial stars.

1. Aster novi-belgii (Michaelmas Daisy)

Aster novi-belgii (Michaelmas Daisy)
In shades of pink, purple, blue and white, these delicate daisy-like blossoms start popping open in late August and continue on until frost. Pinching in the early summer turns these Asters into mounds with dozens of flower buds. [p]Asters will tend to creep throughout your garden, but their airiness allows them to blend particularly well with other flowers. Zones 4 - 9
 

2. Caryopteris (Blue Mist Shrub)

Caryopteris (Blue Mist Shrub)
Caryopteris is a sub-shrub that is often grown in the perennial garden. Caryopteris slowly blossoms in August with dazzling blue flower clusters. Just try and keep the butterflies and bees away. Caryopteris is cut back in early spring, like a Buddleia, and the gray-green foliage is attractive all season. Zones 5 - 9


3. Chelone (Turtlehead)

Nick-named for their blossoms shaped like turtles heads, Chelone is a carefree fall blooming perennial whose only real dislike is excessive dry heat. Chelone behaves itself, growing in a dense clump with attractive foliage and red, pink or white blooms. Zones 2 - 9
 

4. Chrysanthemum

Chrysanthemum
There are many varieties of mums, not all particularly hardy. The plants sold in the fall as 'Hardy Mums' should have been sold to us in the spring, to be reliably hardy in the north. However we wouldn't have had the patience to plant them and wait. Mums and pumpkins are the flag bearers of fall. Try and get your potted mums in the ground ASAP. Keep them well watered and mulch once the ground freezes and you'll stand your best chance of having truly hardy mums. Zones 3 - 9


5. Eupatorium (Joe Pye Weed)

Eupatorium (Joe Pye Weed)
Joe Pye is one of those natives we take for granted because we see it by the side of the road, but it makes a wonderful backdrop to a garden border. The newer Eupatoriums have been bred shorter and less weedy but the dense mop heads of mauve flowers still blend in beautifully in the fall garden. Zones 2 - 9


6. Helenium (Sneezeweed)

Helenium (Sneezeweed)
Helenium is making a resurgence in gardens. They look like small russet-toned coneflowers, in reds, yellows and oranges. Many helenium can grow quite tall and will need to be staked or pinched. Like clematis, they like cool feet and hot heads. helenium is also a good choice for poorly drained areas. Zones 3 - 9


7. Helianthus (Perennial Sunflower)

Helianthus (Perennial Sunflower)
Helianthus is a good natured, jolly plant, branching and flopping on its neighbors. The brilliant gold fluffy daisy-like flowers make an instant focal point and attract butterflies and birds. Helianthus tend to be sterile and can be reproduced by division. Zones 3 - 9


8. Heliopsis (False Sunflower)

Heliopsis is very similar to Helianthus. Heliopsis tends to begin blooming earlier in the season and stays on for 8 or more weeks. Newer varieties have been bred smaller and sturdier, for less flopping. Zones 3 - 9


9. Sedum (Stonecrop)

Sedum (Stonecrop)
Sedum 'Autumn Joy' comes as close to perfection as any plant can. It looks good all year, requires minimal attention and attracts few problems. It's only drawback is that it is not deer resistant. 'Autumn Joy' has been joined in the garden by a growing number of fall wonders like: 'Bertram Anderson, 'Brilliant' and 'Matrona'. No fall garden is complete without sedum. Zones 3 - 9


10. Solidago (Goldenrod)

Solidago (Goldenrod)
Goldenrod is finally getting the respect it deserves, especially with introductions like 'Fireworks' and 'Golden Fleece'. Unlike the native solidagos that spread everywhere and never stood up on their own, these newer varieties are sturdy and chock full of fall blooms. Zones 3 - 9

Tin Can Flowers


Decide what colors to paint the cans. Select a rust-inhibiting paint such as Tremclad spray paint. If the look of the original aluminum is preferred, select a clear coat spray, instead.
Set up a work area outdoors in a location where ventilation is good, on a day that is not too windy. A portable workbench lined with newspaper set up in the driveway or back yard is ideal for spray painting the cans.
Wearing old work clothes and a pair of rubber gloves, spray each can according to the product’s directions. It is not necessary to paint the interior of the cans. Allow the cans to dry thoroughly. 
Avoid planting directly in the coffee cans, instead placing a reused plastic flower pot inside as a liner. This will allow for better drainage. A six inch plastic flower pot will normally fit into a large coffee can. A smaller pot can be placed upside down in the bottom of the can to raise up the level of the plant set inside. Experiment with the plastic pots that are left from last season’s garden, and avoid purchasing new pots, since the goal of this project is to reuse existing household materials.
Arrange the brightly-colored coffee can planters in groups around the deck or balcony, planted up with blooming annuals, edible flowers such as nasturtiums, herbs or even vegetables, depending on the size of the can and variety of the plant.
When the growing season is over, and it’s time to clean up the garden for autumn and winter, remember to bring the cans into the garden shed, garage or basement to ensure they will last for several seasons. If necessary, touch up the paint if it gets scratched or the paint becomes chipped as the pots sit outside.